


From unsplash by Markus Winkler
1. Introduction
The RecylerView is one of the most used Android components when it comes to displaying a list of items in an Android application, and since the arrival of Jetpack in the Android ecosystem, some libraries have come to life to simplify its use.
But when it comes to developing an application that needs to display a heterogeneous list of items or that scrolls in several directions (vertically and horizontally) the use of RecyclerView can be complicated.
In this article we will see step by step how to simplify life when it comes to displaying complex lists using a library called Epoxy.
2. What is epoxy
Epoxy is an Android library for building complex screens in a RecyclerView developed by AirbnbEng
3. Some Advantages of Epoxy
Without epoxy
If you have used the RecyclerView before, you may be familiar with the steps you need to go through to view items in the list as shown in the following figure.
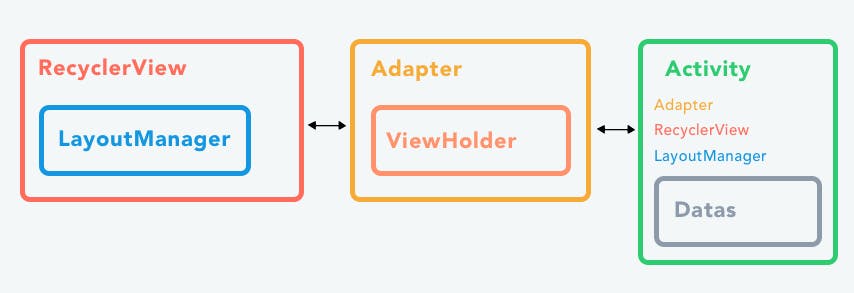
Add a component of type RecyclerView in the layout.
Create a view in an XML file that represents an element of the list.
Create an Adapter to connect the data to the view to display it in the list.
With Epoxy
Of the three stages mentioned above, the most repetitive stage, which becomes more complex depending on the situation, is the third stage, which consists of creating an adapter, and when it comes to having a list with nested RecyclerViews, things can get a little more complicated.
And this is where Epoxy will help us in the sense that with Epoxy it is no longer necessary to create an adapter, Epoxy will do it for us and we will see how in the rest of the article.
4. Epoxy In Action
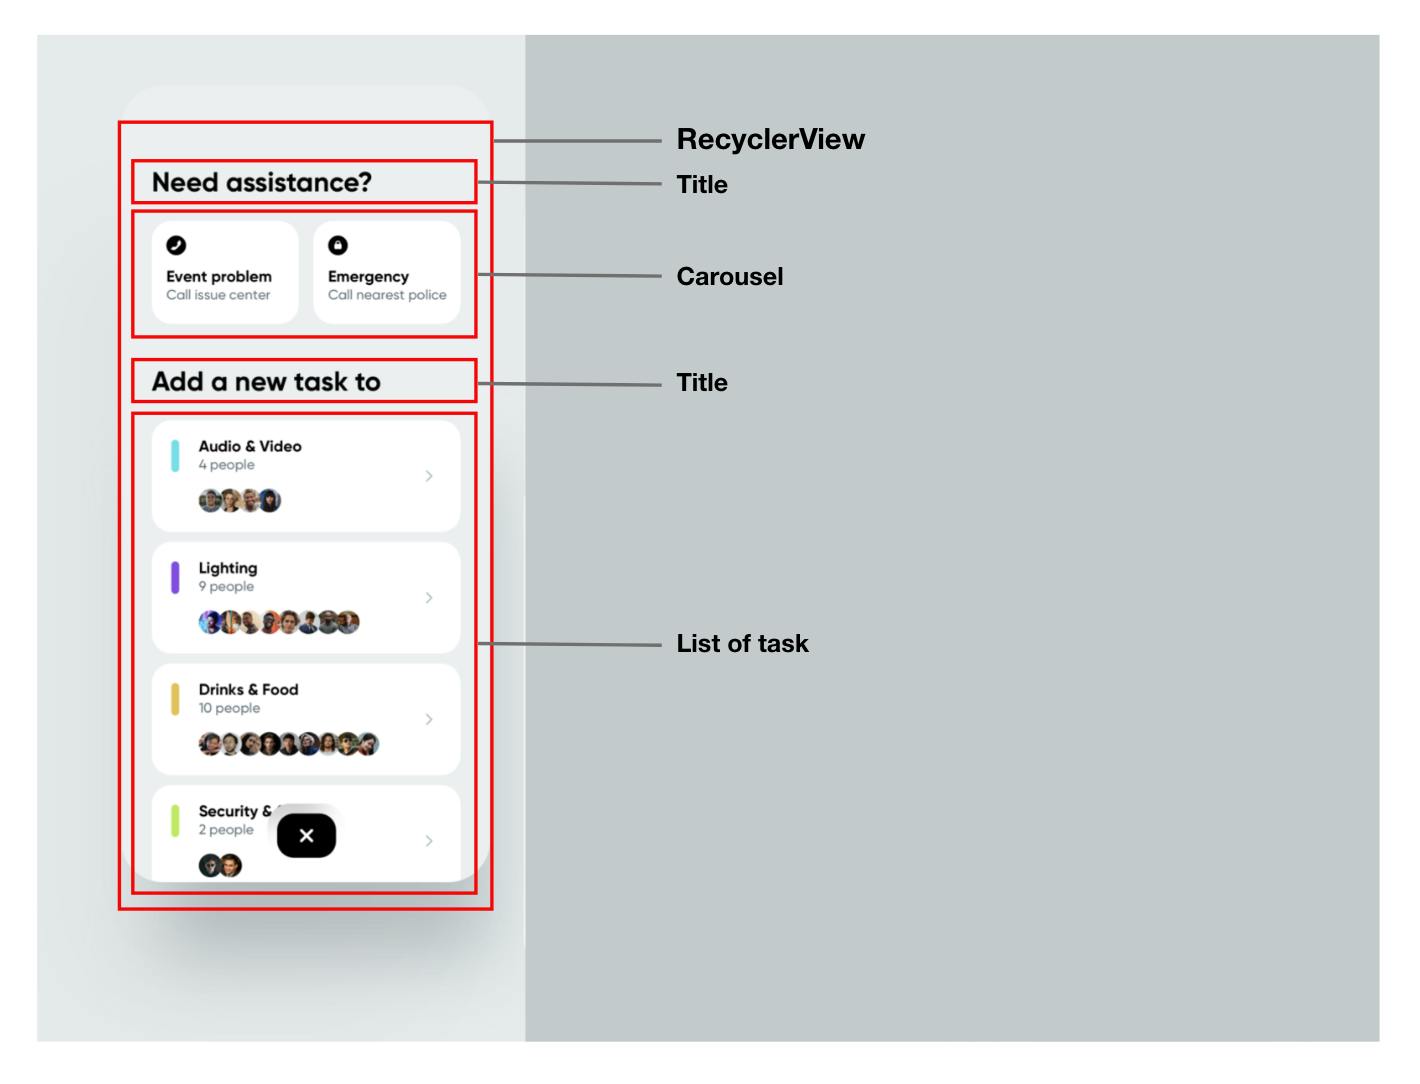
To illustrate the use of epoxy, we are going to develop an application that looks like the following figure
We will only focus on the first view of this image.
](https://cdn-images-1.medium.com/max/3200/1*yQ3t0sFkZ5TbQJcbkNFa3A.png) Task App by Lorenzo Perniciaro
Task App by Lorenzo Perniciaro
If we analyse this view very carefully, we notice that the RecyclerView contains a number of elements
The title of the carousel.
A carousel (a horizontal list of elements).
A title of the tasks.
A list of tasks.
Installation
Gradle is the only supported build configuration, so just add the dependency to your project build.gradle file, and if you use Kotlin, your build.gradle file will look like this.
apply plugin: 'kotlin-kapt'

kapt {
    correctErrorTypes = true
}

android {
  dataBinding {
    enabled = true
  }
}

// .....

dependencies {
  implementation "com.airbnb.android:epoxy:$epoxyVersion"
  implementation "com.airbnb.android:epoxy-databinding:$epoxyVersion"
  kapt "com.airbnb.android:epoxy-processor:$epoxyVersion"
}
Basic usage
After adding Epoxy to the Gradle file, you just have to create the UI of each element of the RecyclerView.
RecyclerView Items
1. Title Item
We are going to create a view that will represent the title in the RecyclerView, and with the dataBinding we will make it possible to inject the title from the outside to facilitate the reuse of this view.
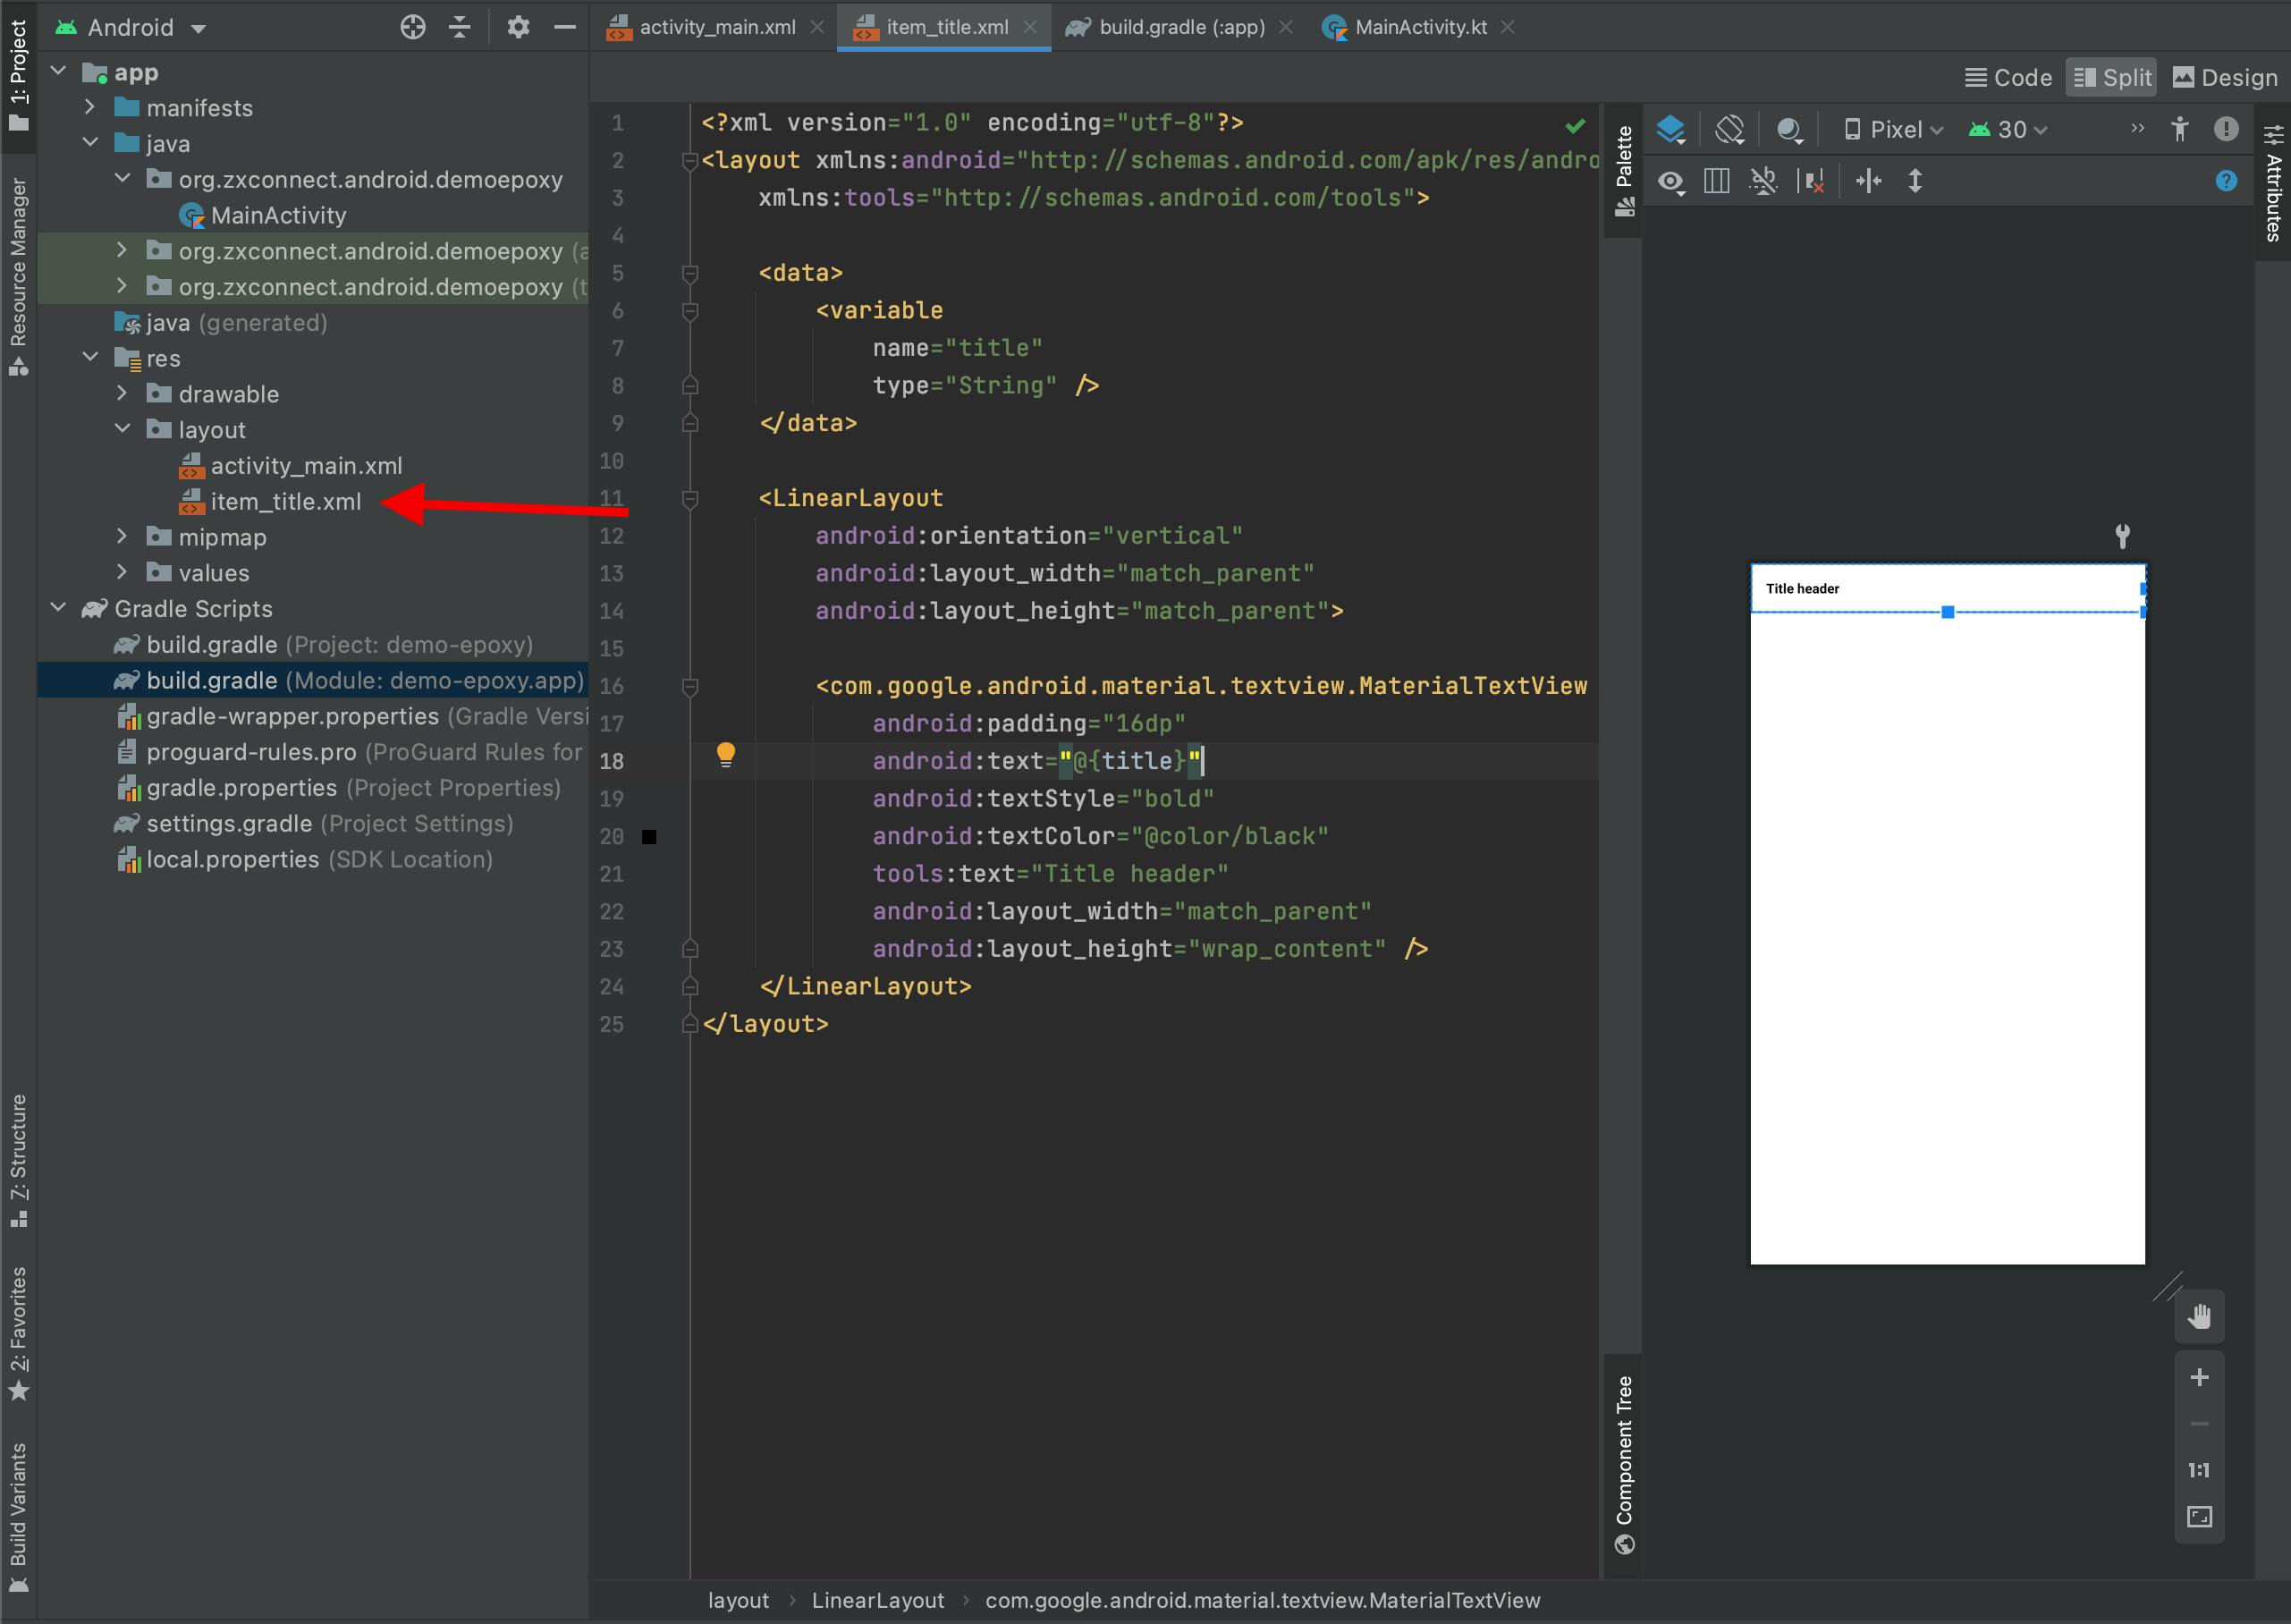 item_title.xml Preview
As you have noticed, the layout takes a variable of type String, and the name of the layout begin with item we’ll see what we’ll use it for afterwards.
2. Carousel Item
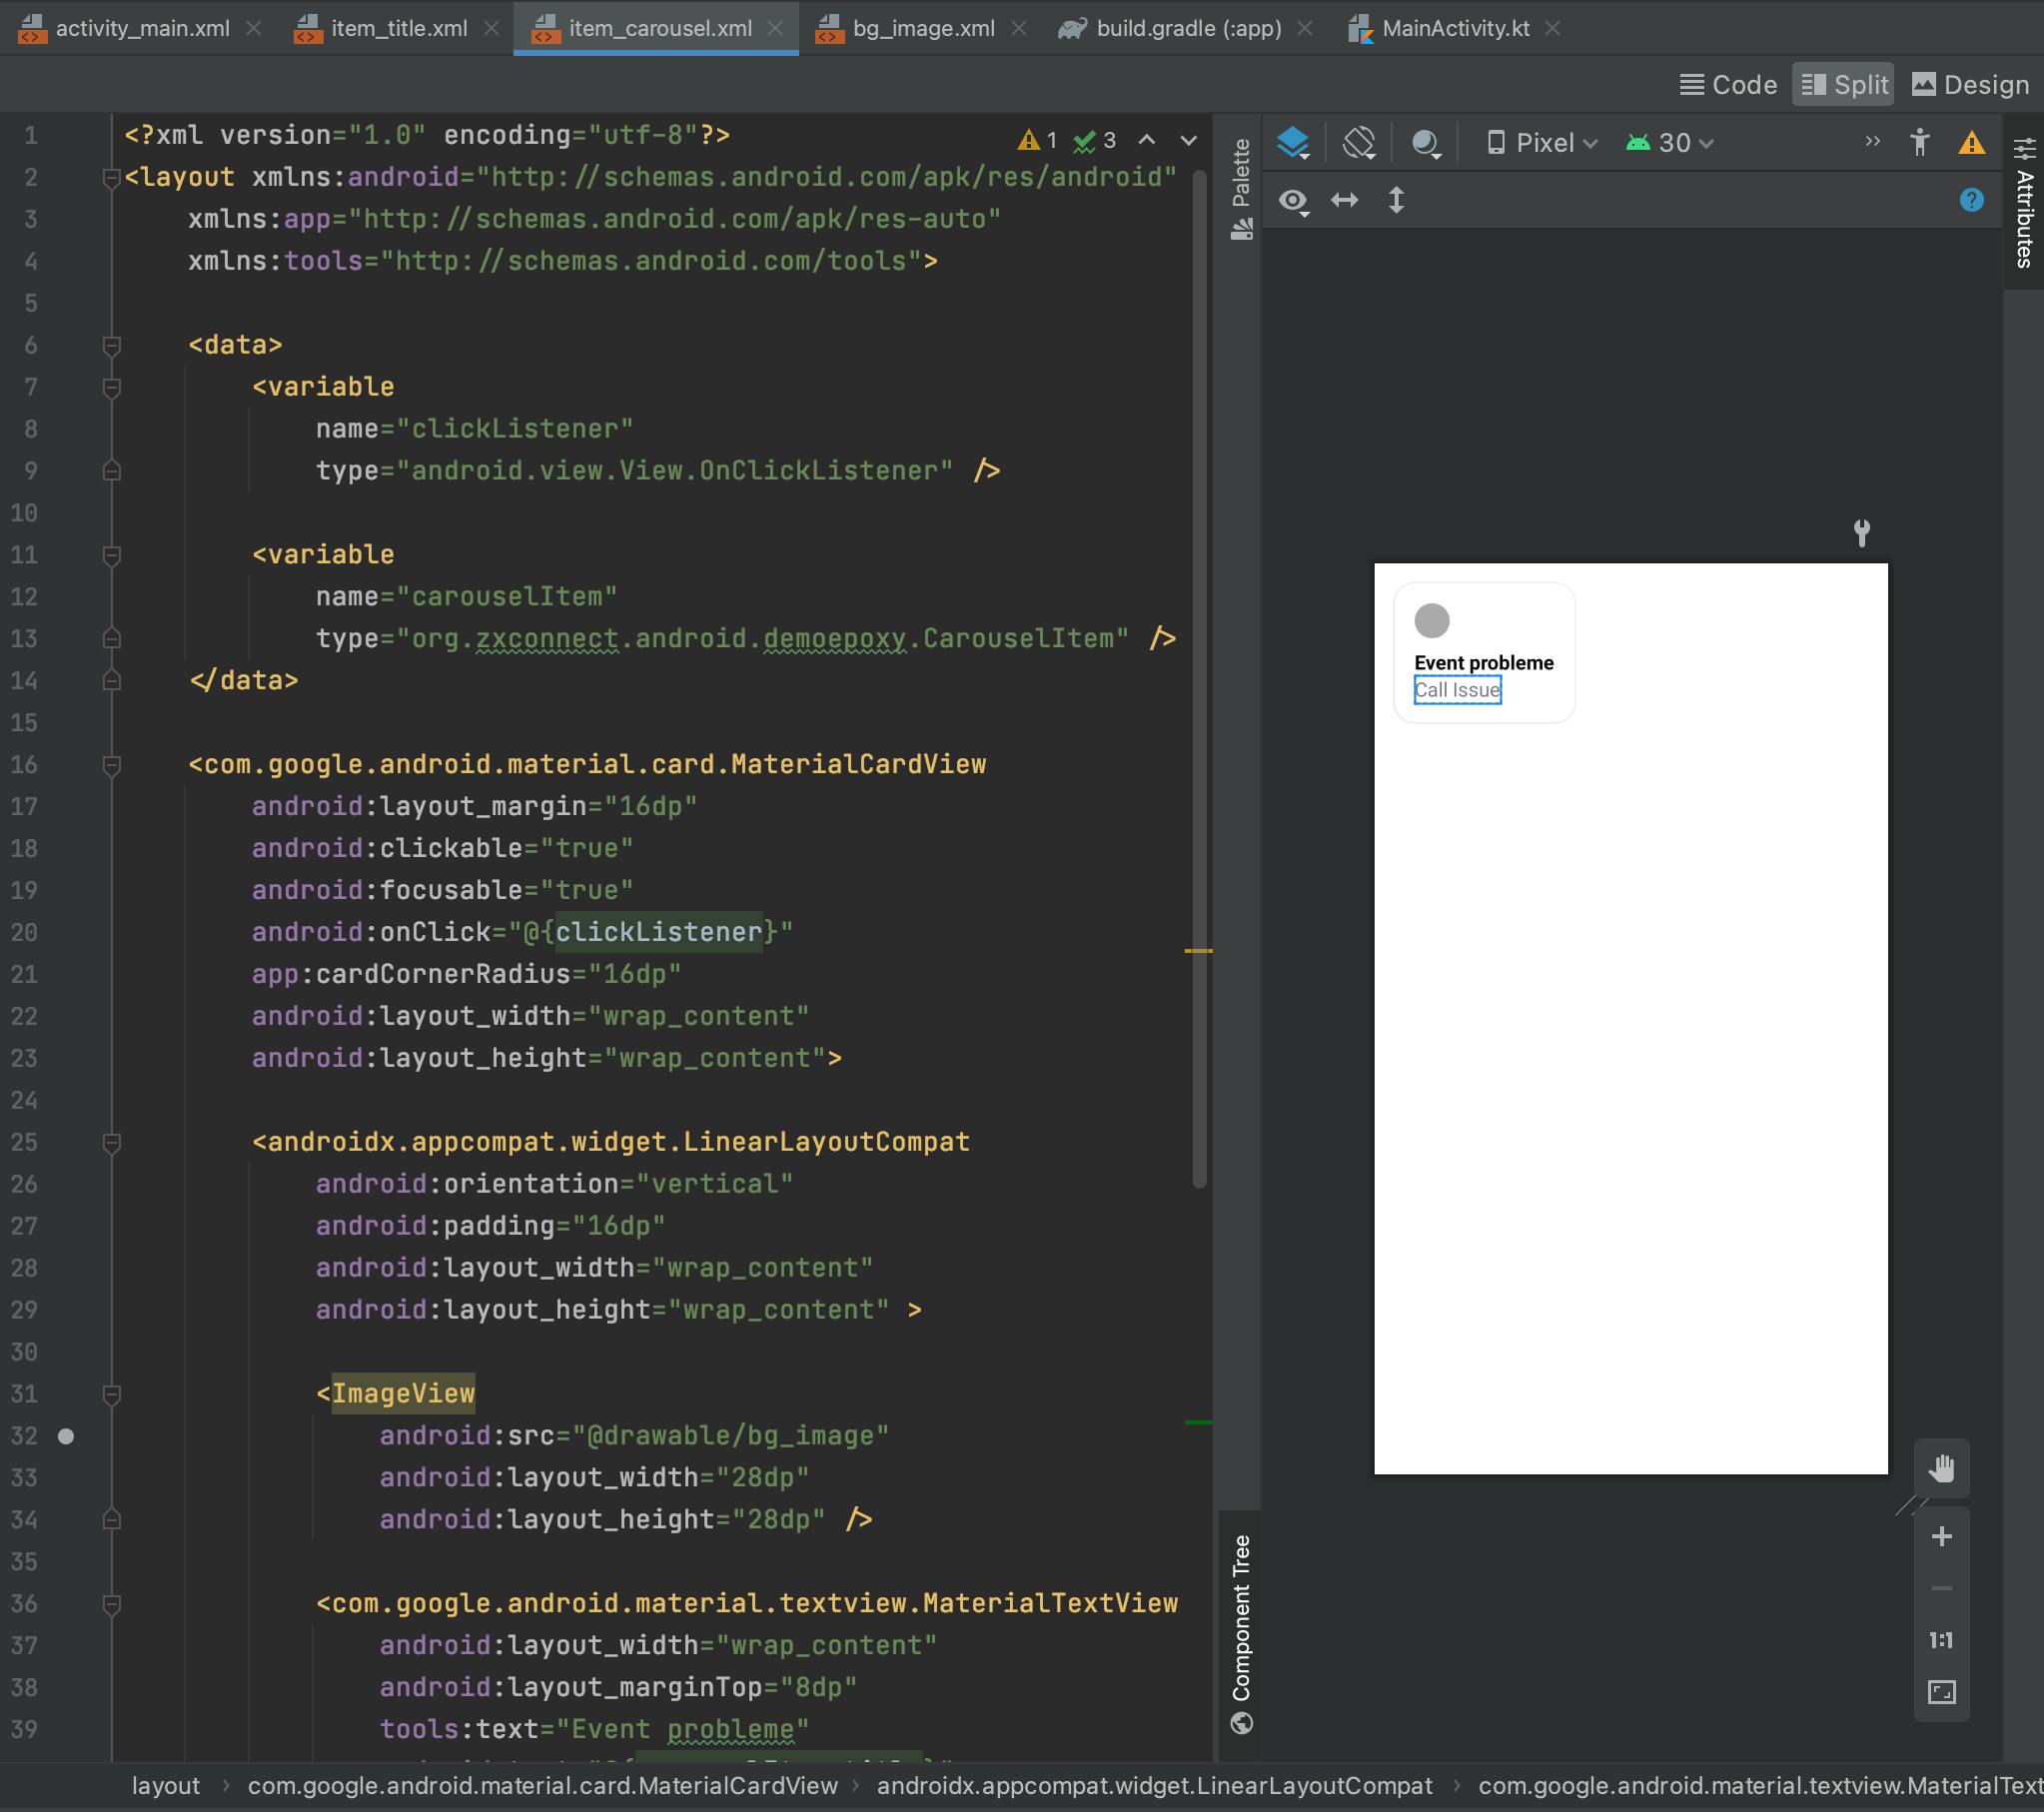 item_task_carousel.xml Preview
The view that represents the carousel follows the same principle as the previous view, but this time the view has a variable of type OnClickListener that we have attached CardView in addition to a variable of type CarouselItem.
The complete layout code is as follows.
<?xml version="1.0" encoding="utf-8"?>
<layout xmlns:android="http://schemas.android.com/apk/res/android"
    xmlns:app="http://schemas.android.com/apk/res-auto"
    xmlns:tools="http://schemas.android.com/tools">

    <data>
        <variable
            name="clickListener"
            type="android.view.View.OnClickListener" />

        <variable
            name="carouselItem"
            type="org.zxconnect.android.demoepoxy.CarouselItem" />
    </data>

    <com.google.android.material.card.MaterialCardView
        android:layout_margin="16dp"
        android:clickable="true"
        android:focusable="true"
        android:onClick="@{clickListener}"
        app:cardCornerRadius="16dp"
        android:layout_width="wrap_content"
        android:layout_height="wrap_content">

        <androidx.appcompat.widget.LinearLayoutCompat
            android:orientation="vertical"
            android:padding="16dp"
            android:layout_width="wrap_content"
            android:layout_height="wrap_content" >

            <ImageView
                android:src="@drawable/bg_image"
                android:layout_width="28dp"
                android:layout_height="28dp" />

            <com.google.android.material.textview.MaterialTextView
                android:layout_width="wrap_content"
                android:layout_marginTop="8dp"
                tools:text="Event probleme"
                android:text="@{carouselItem.title}"
                android:textColor="@android:color/black"
                android:textStyle="bold"
                android:textSize="16sp"
                android:layout_height="wrap_content" />

            <com.google.android.material.textview.MaterialTextView
                android:layout_width="wrap_content"
                tools:text="Call Issue"
                android:text="@{carouselItem.description    }"
                android:textSize="16sp"
                android:layout_height="wrap_content" />

        </androidx.appcompat.widget.LinearLayoutCompat>

    </com.google.android.material.card.MaterialCardView>
</layout>
3. Task Item
The same principle is also applied before to the view that represents a task.
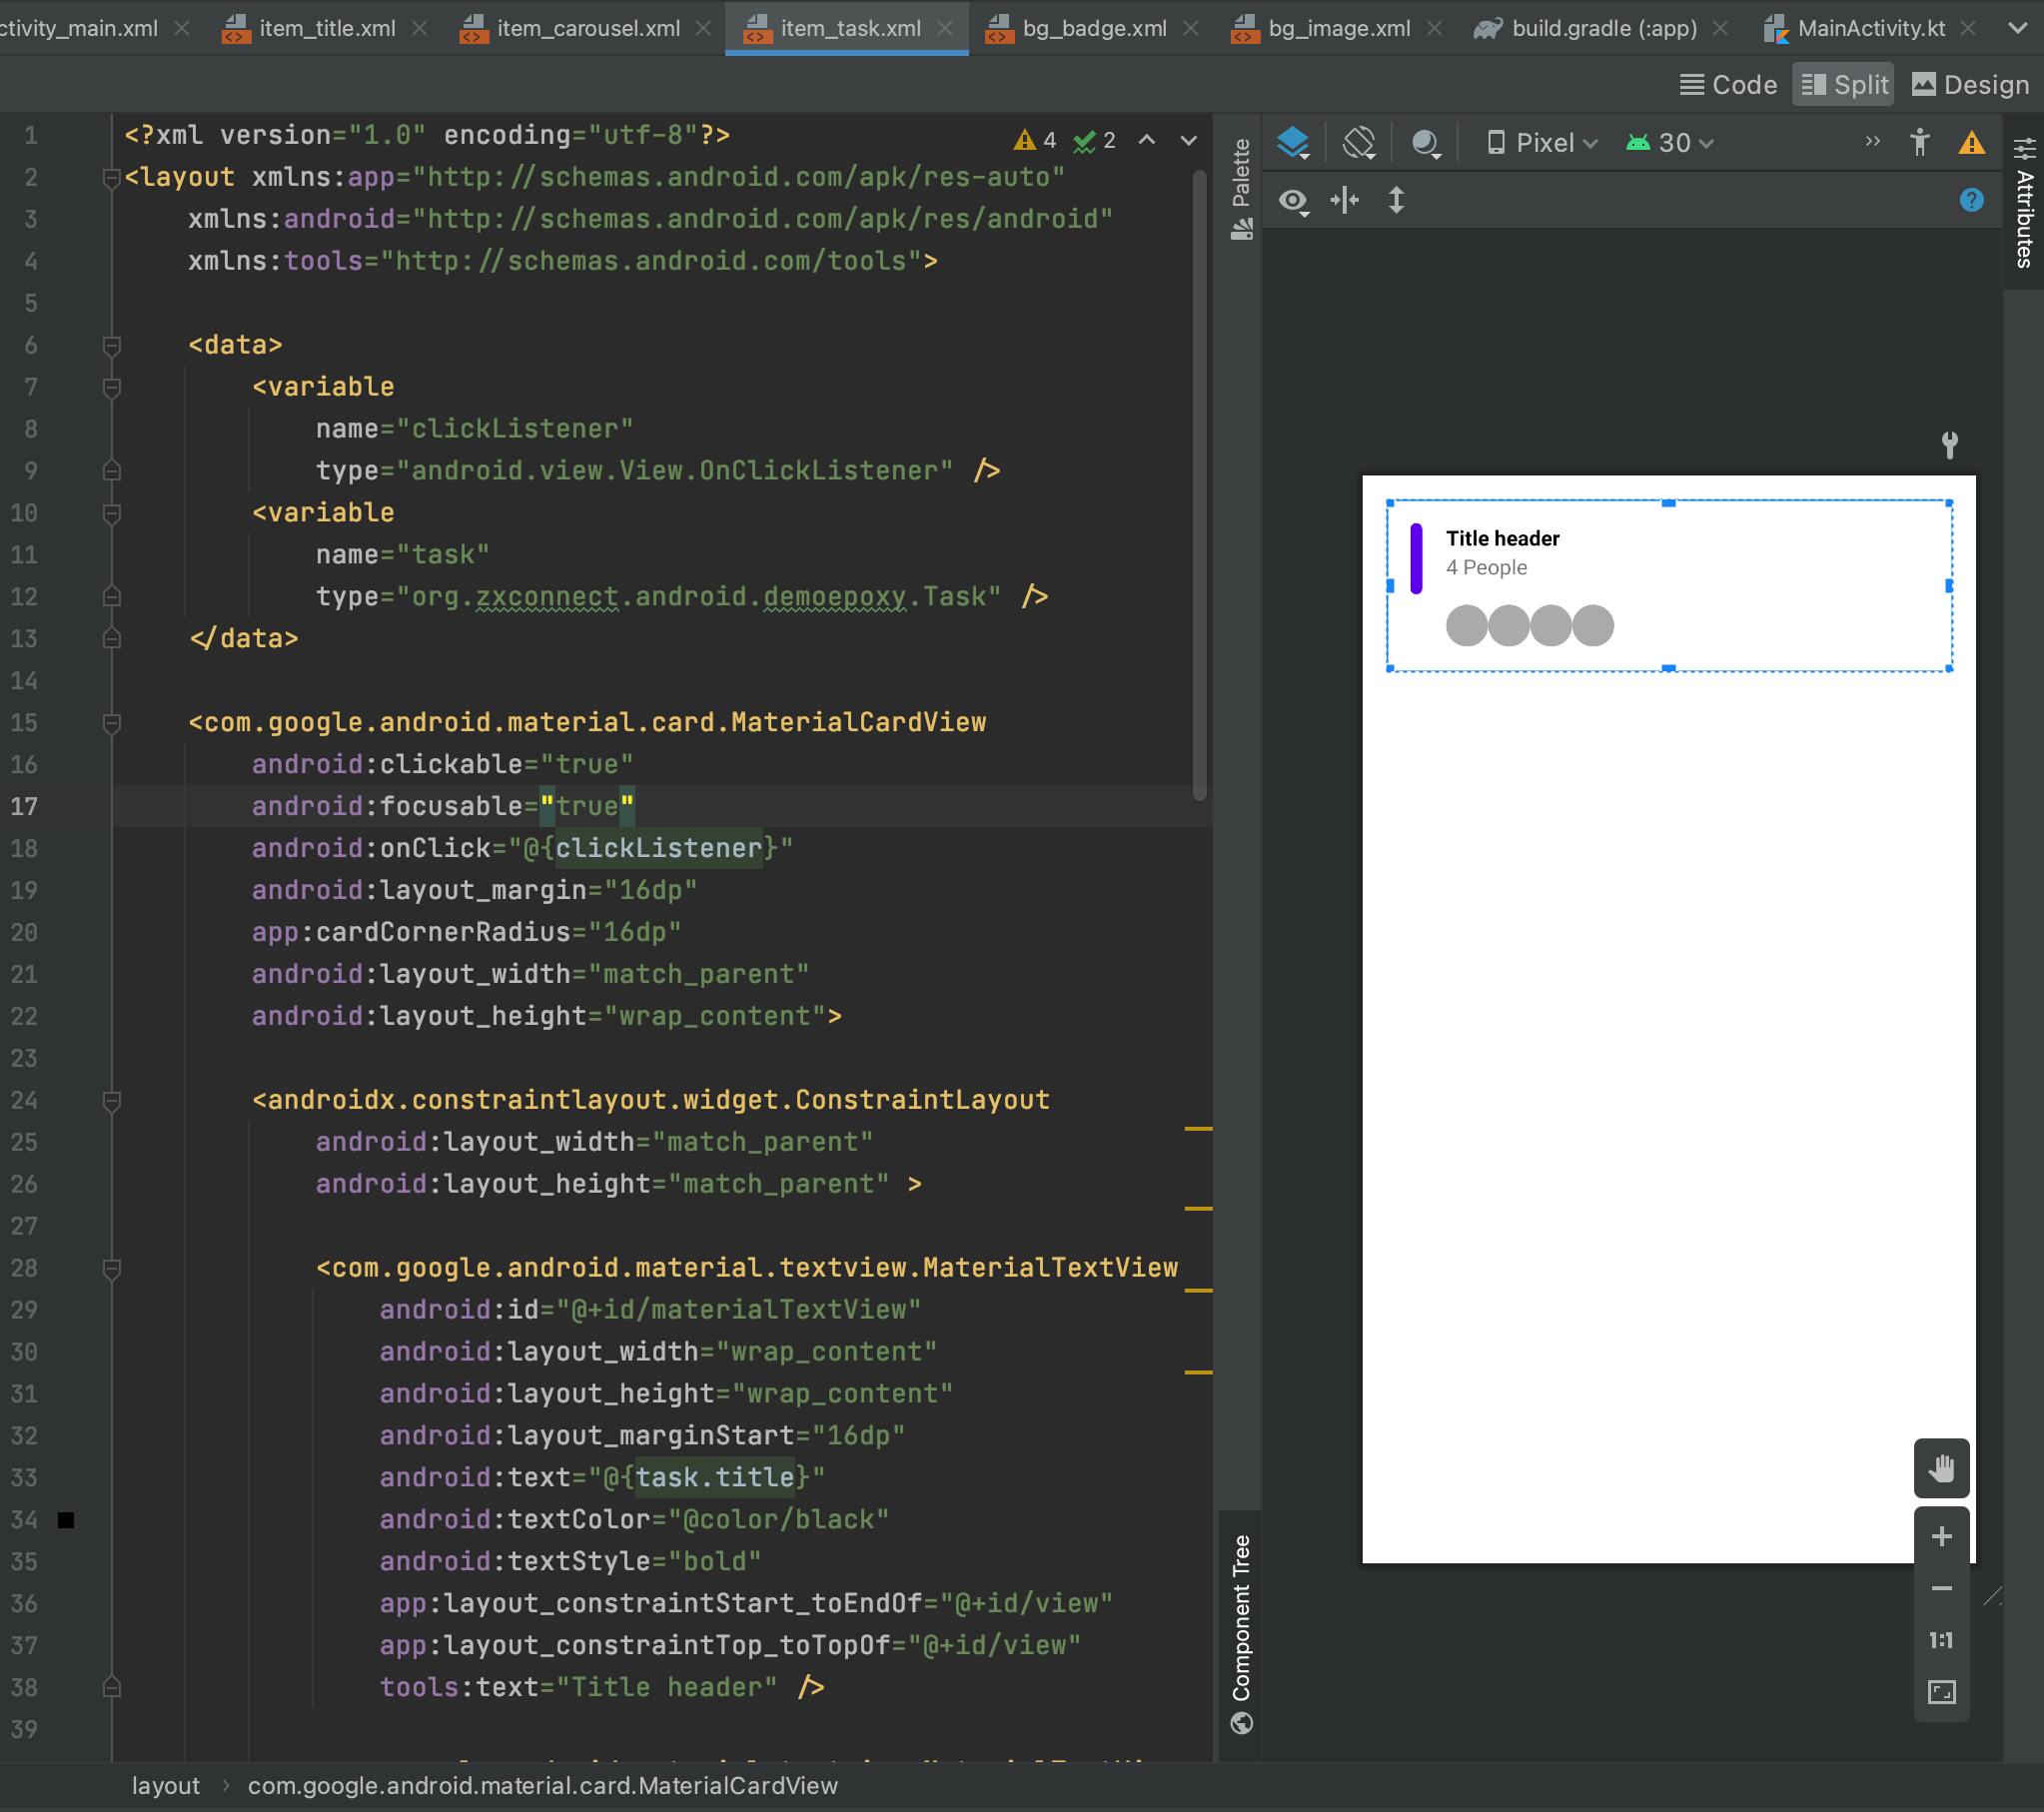 item_task.xml Preview
The source code for this view is as follows:
<?xml version="1.0" encoding="utf-8"?>
<layout xmlns:app="http://schemas.android.com/apk/res-auto"
    xmlns:android="http://schemas.android.com/apk/res/android"
    xmlns:tools="http://schemas.android.com/tools">

    <data>
        <variable
            name="clickListener"
            type="android.view.View.OnClickListener" />
        <variable
            name="task"
            type="org.zxconnect.android.demoepoxy.Task" />
    </data>

    <com.google.android.material.card.MaterialCardView
        android:clickable="true"
        android:focusable="true"
        android:onClick="@{clickListener}"
        android:layout_margin="16dp"
        app:cardCornerRadius="16dp"
        android:layout_width="match_parent"
        android:layout_height="wrap_content">

        <androidx.constraintlayout.widget.ConstraintLayout
            android:layout_width="match_parent"
            android:layout_height="match_parent" >

            <com.google.android.material.textview.MaterialTextView
                android:id="@+id/materialTextView"
                android:layout_width="wrap_content"
                android:layout_height="wrap_content"
                android:layout_marginStart="16dp"
                android:text="@{task.title}"
                android:textColor="@color/black"
                android:textStyle="bold"
                app:layout_constraintStart_toEndOf="@+id/view"
                app:layout_constraintTop_toTopOf="@+id/view"
                tools:text="Title header" />

            <com.google.android.material.textview.MaterialTextView
                android:id="@+id/materialTextView2"
                android:layout_width="wrap_content"
                android:layout_height="wrap_content"
                android:text='@{String.format("%d people", task.peopleCount)}'
                app:layout_constraintStart_toStartOf="@+id/materialTextView"
                app:layout_constraintTop_toBottomOf="@+id/materialTextView"
                tools:text="4 People" />

            <androidx.appcompat.widget.LinearLayoutCompat
                android:layout_width="0dp"
                android:layout_height="wrap_content"
                android:layout_marginTop="16dp"
                android:layout_marginBottom="16dp"
                android:orientation="horizontal"
                app:layout_constraintBottom_toBottomOf="parent"
                app:layout_constraintEnd_toEndOf="parent"
                app:layout_constraintStart_toStartOf="@+id/materialTextView2"
                app:layout_constraintTop_toBottomOf="@+id/materialTextView2">

                <ImageView
                    android:layout_width="28dp"
                    android:layout_height="28dp"
                    android:src="@drawable/bg_image" />

                <ImageView
                    android:layout_width="28dp"
                    android:layout_height="28dp"
                    android:src="@drawable/bg_image" />

                <ImageView
                    android:layout_width="28dp"
                    android:layout_height="28dp"
                    android:src="@drawable/bg_image" />

                <ImageView
                    android:layout_width="28dp"
                    android:layout_height="28dp"
                    android:src="@drawable/bg_image" />
            </androidx.appcompat.widget.LinearLayoutCompat>

            <View
                android:id="@+id/view"
                android:layout_width="8dp"
                android:layout_height="48dp"
                android:layout_marginStart="16dp"
                android:layout_marginTop="16dp"
                android:background="@drawable/bg_badge"
                app:layout_constraintStart_toStartOf="parent"
                app:layout_constraintTop_toTopOf="parent" />
        </androidx.constraintlayout.widget.ConstraintLayout>

    </com.google.android.material.card.MaterialCardView>
</layout>
5. Model generation.
1. Epoxy Config
After creating the different views of our RecyclerView, it is now high time to configure Epoxy on how it will generate some components for us
Create a package-info.java file in any package of your project as shown in the following figure
Using the @EpoxyDataBindingPattern annotation on Config interface, you tell epoxy the criteria of the XML files for which it will generate a model that will be used in the code.
In our case layoutPrefix corresponds to the string “item”, this is the reason why all the layouts that will be used as views in the RecyclerView were prefixed by item, so Epoxy will generate a model for
item_title.xmlitem_task.xmlitem_task_carousesl.xml
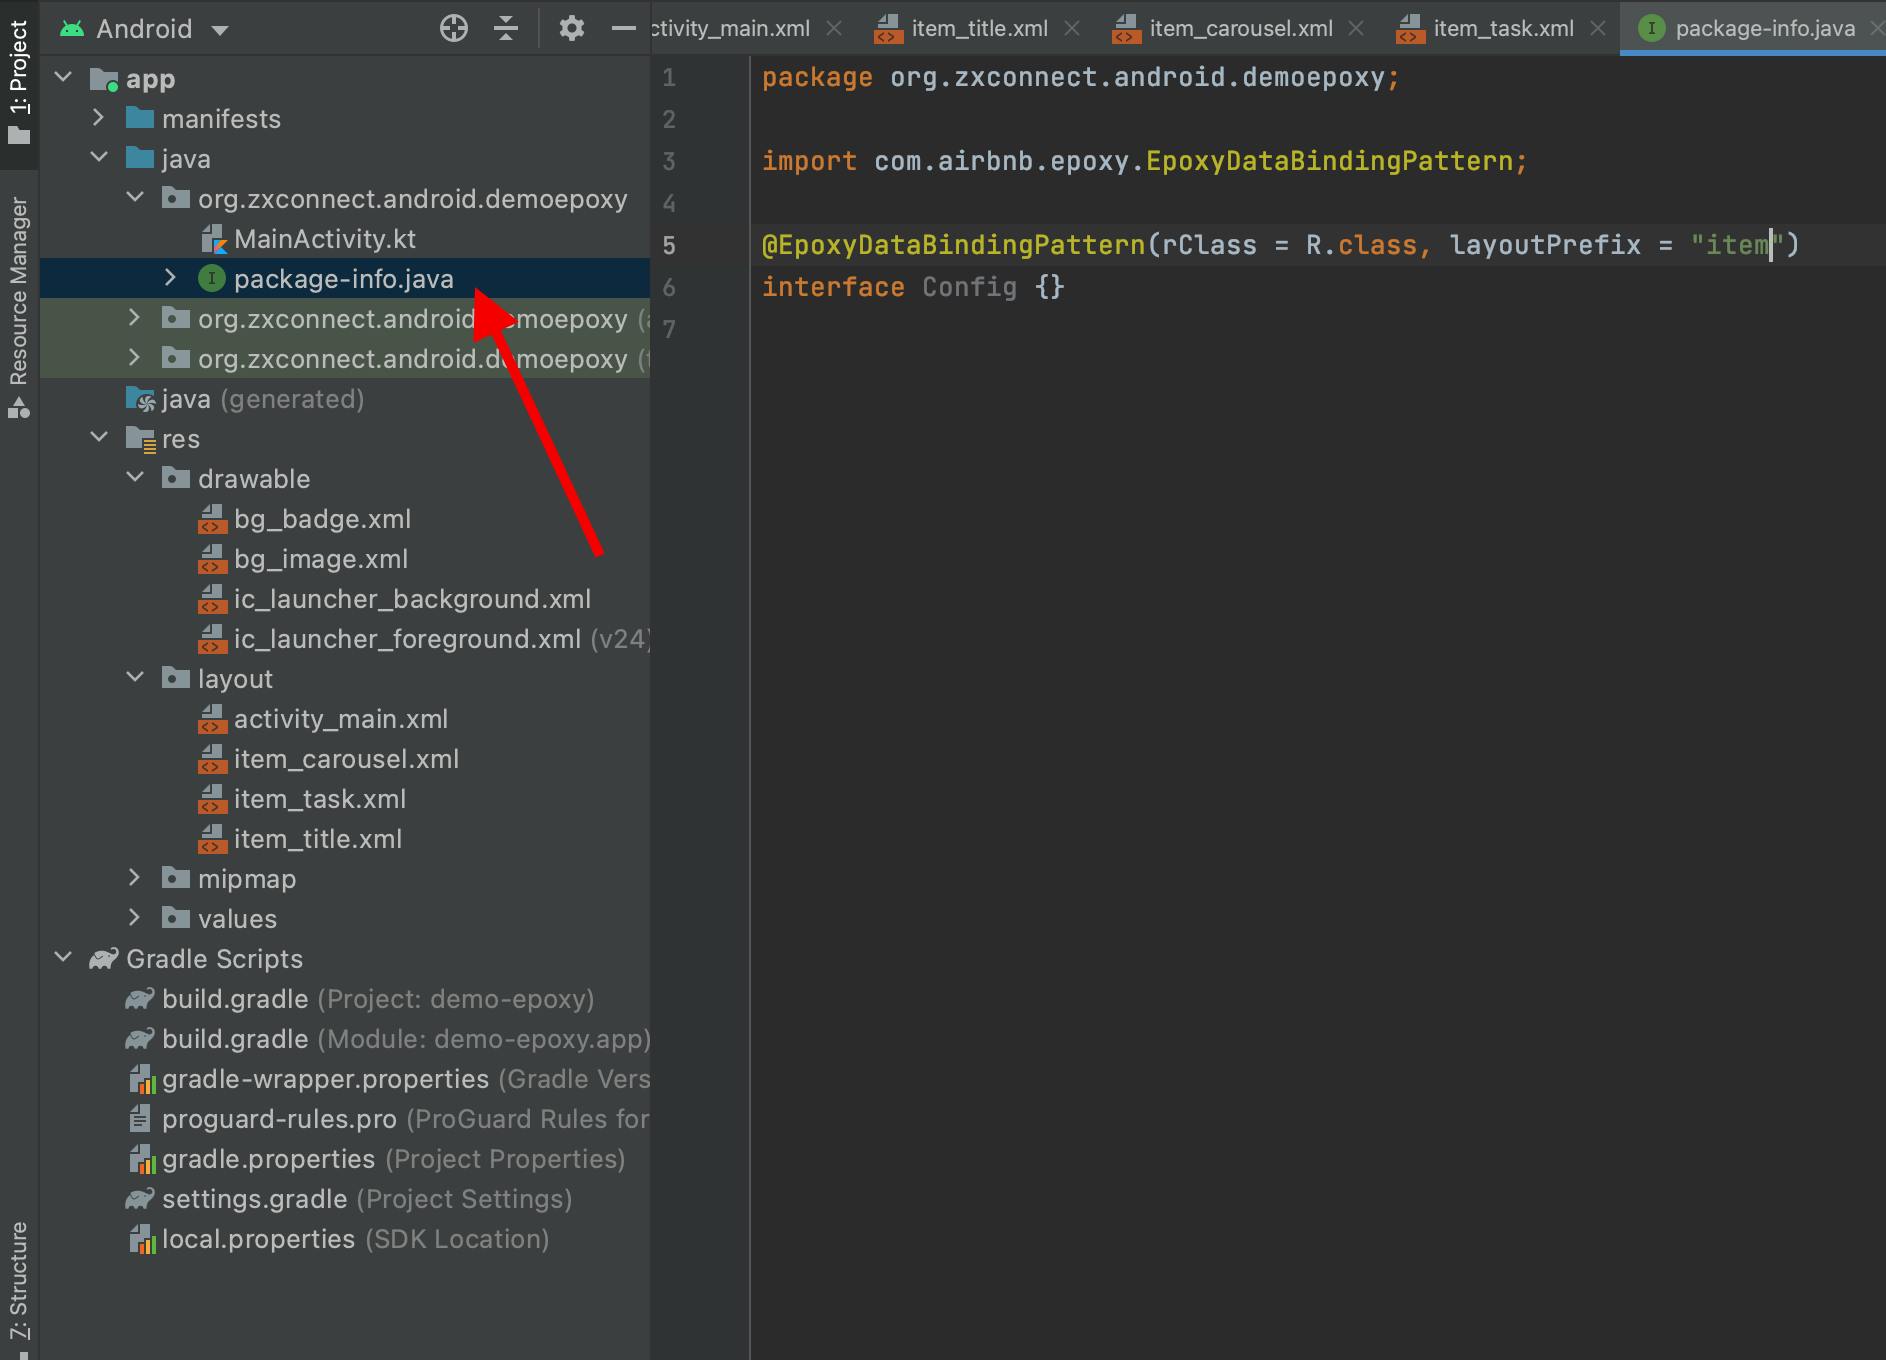 package-info.java
2. Displaying data
After indicating to Epoxy the criteria of the layouts to be used, we have to build the project so that Epoxy can generate some classes for us,
After that, replace your RecyclerView with EpoxyRecyclerView in the MainActivity layout, and by default, EpoxyRecyclerView is attached to the LinearLayoutManager so there is no need to put it on.
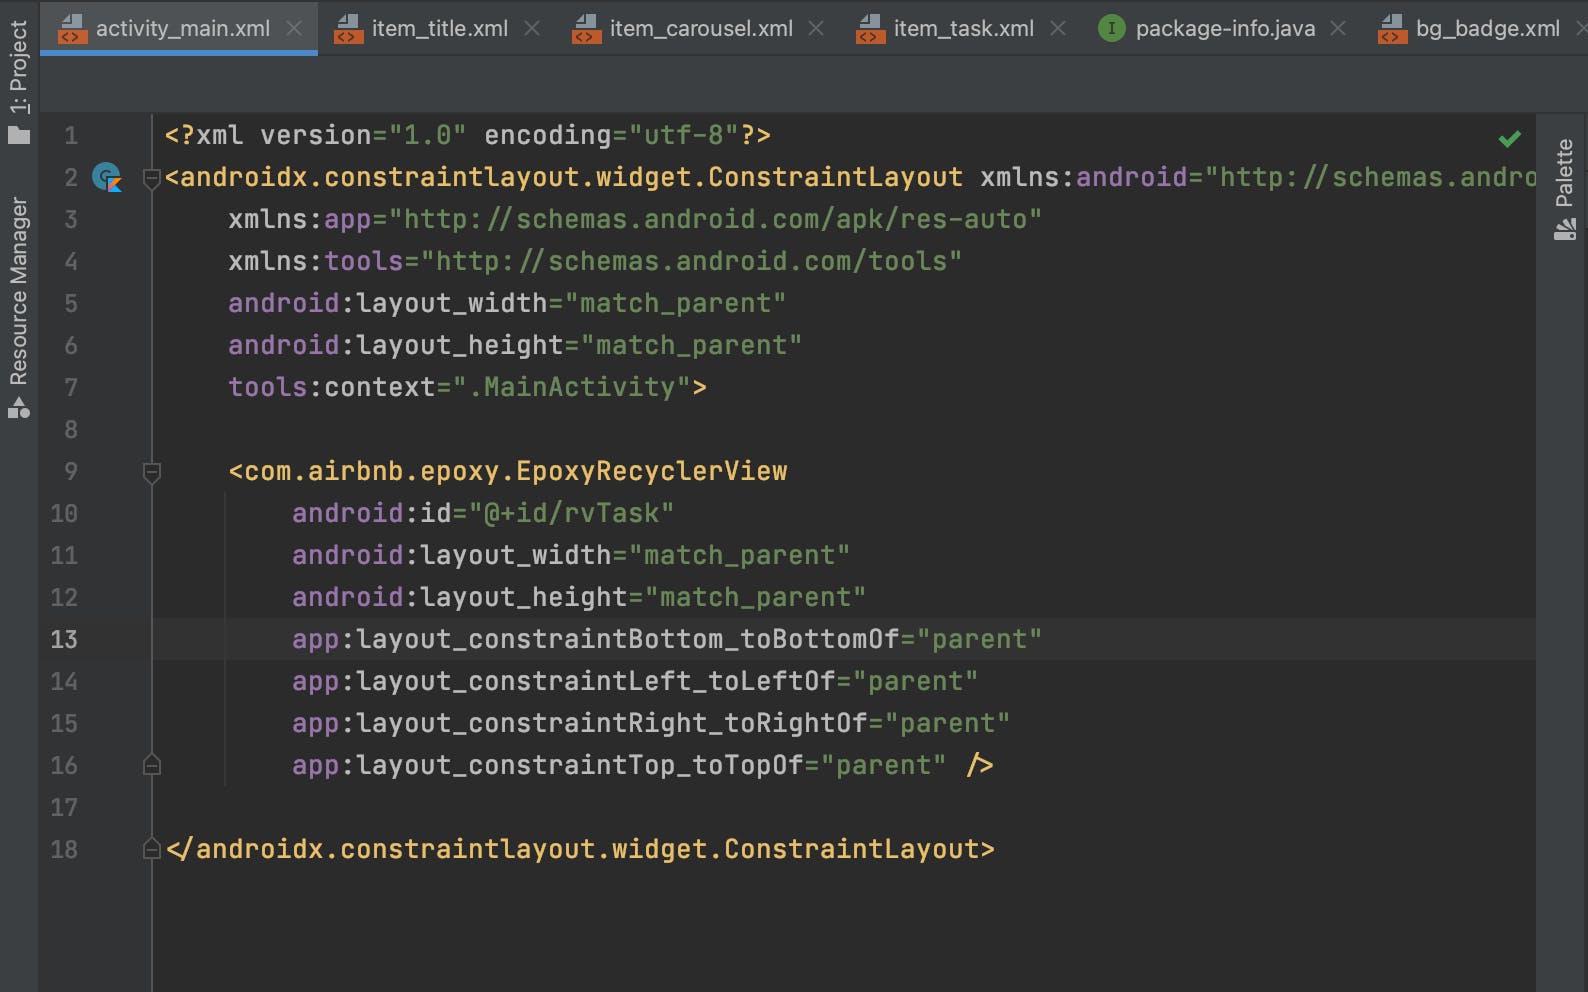 activity_main.xml
To display the elements in the EpoxyRecyclerView, just call the different methods that correspond to each item generated by Epoxy inside the withModels method from EpoxyRecyclerView
For
item_title.xmlthe method to generate istitle(String)For
item_task.xml, the method to generate istask(Task)And for
item_task_carousesl.xml, the method istitleCarousel(CarouselItem)
All its methods take a lambda as parameter in which we can pass them to layout as a method
Remember that the file item_task.xml had a variable of type Task, that’s why on line 47, we called the method task() by passing a Task object that we would like to display.
Each element must have a unique id to be displayed properly.
class MainActivity : AppCompatActivity() {
    override fun onCreate(savedInstanceState: Bundle?) {
        super.onCreate(savedInstanceState)
        setContentView(R.layout.activity_main)
        setupRecyclerView()
    }

    private fun setupRecyclerView() {
        val rvTask = findViewById<EpoxyRecyclerView>(R.id.rvTask)
        rvTask.withModels {
            // First title
            title {
                id("title-id")
                title("Need Assistant")
            }

            // Carousel Item
            val carouselItemModels = carouselItems.map { currentItem ->
                TaskCarouselBindingModel_()
                    .id(currentItem.id)
                    .carouselItem(currentItem)
                    .clickListener { v ->

                    }

            }

            // Carousel
            // This extension function come with epoxy
            carousel {
                id("car")
                models(carouselItemModels)
            }

            // Task title
            // item_title.xml
            title {
                id("title-id")
                title("Need Assistant")
            }

            // Tasks
            tasks.forEach { currentTask ->
                // item_task.xml
                task {
                    id(currentTask.id)
                    task(currentTask)
                    clickListener { v ->

                    }
                }
            }
        }
    }
}
3. Carousel
For the carousel the process is a bit different (from line 18 to 33), you have to use the carousel extension method that comes with Epoxy, all the elements placed in the lambda of this method will be displayed in a horizontal list.
For each item, epoxy generates a class following this convention, for :
item_title.xml:TitleBindingModel_item_task.xml:TaskBindingModel_item_task_carousesl.xml:TaskCarouselBindingModel_
Those classes extends EpoxyModel
And the method models() of the carousel take a list of EpoxyModel here’s why we converted the CarouselItem List into a List of TaskCarouselBindingModel_<CarouselItem> to be displayed.
Conclusion
When developing an Android application sometimes you have to get help avoiding to recreate certain elements, and using Epoxy can save you a lot of time by avoiding you to type repetitive code.
If you want to test the application you can find the source code using the following link
And to know a little more about epoxy for could this link