


1. Introduction
If you're an Android developer, whether you've been one for a few years or just a few weeks, Jetpack Compose needs no introduction. It's a moderm toolkit built entirely in Kotlin, recommended by Google for building Native UI on Android, and its main purpose is to accelerate the development of Android applications.
And since Jetpack Compose's appearance, the interest in taking advantage of its benefits on platforms other than Android began to be felt more and more, which is what motivated Jetbrains to use the power of the Kotlin language, which already works well on platforms other than Android, to bring Jetpack Compose to platforms other than Android, and that's when Compose Multiplatform was born.
As you can imagine, Compose Multiplatform lets developers reuse build the user interface once, and use it on all platforms – Android, iOS, web, and desktop. Save yourself the effort of keeping different UIs in sync, and get your app into the hands of your users more quickly.
In a nutshell.
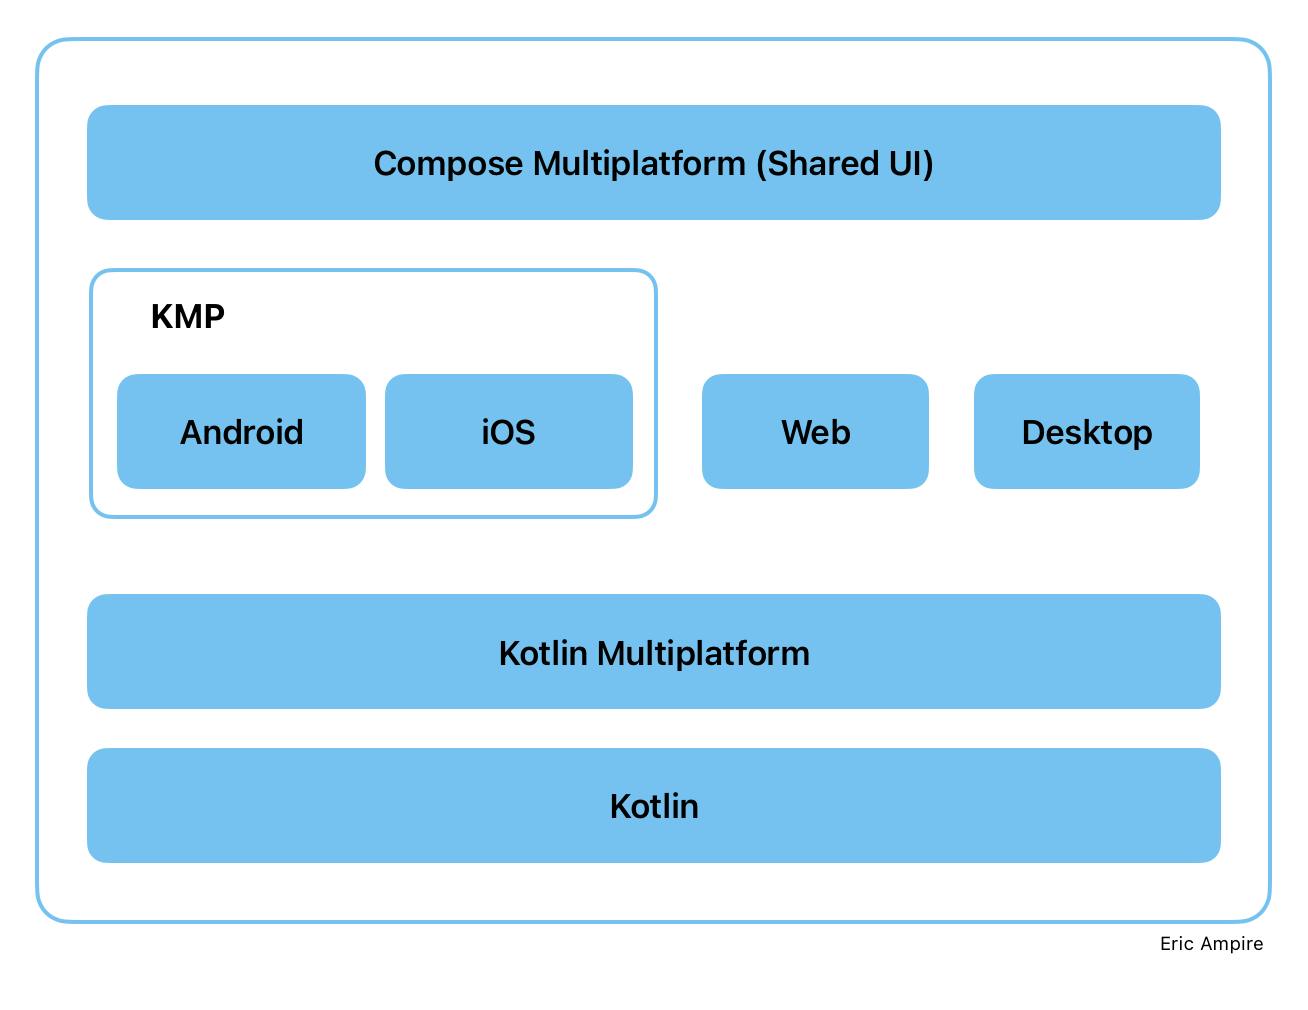
Kotlin Multiplatform : Kotlin Multiplatform allows you to create applications for various platforms and efficiently reuse code across them while retaining the benefits of native programming. Your multiplatform applications will work on different operating systems, such as iOS, Android, macOS, Windows, Linux, and others.
KMP or Kotlin Multiplatform Mobile : Kotlin Multiplatform dedicated only for Mobile Development (Android and iOS)
Compose Multiplatform : A Kotlin Multiplatform version of Jetpack Compose
2. What's Circuit
Circuit is a simple, lightweight, and extensible framework developed by Slack for building Kotlin applications.
And as you'll have noticed in the rest of this article, Circuit uses many of the Jetpack Compose mechanisms, but this doesn't quite answer the question of what Compose Multiplateform has to do with Circuit.
3. KMP and Compose Multiplatform Challenges
When you start building applications using Compose Multiplatform and KMP, as opposed to Jetpack Compose, Compose Multiplatform comes with a number of challenges
Compose Multiplatform and KMP are relatively new technologies, and while they're very promising, they're still sorely lacking in tools and can sometimes be prone to bugs.
Compose Multiplateform is still under development, which means that not all the graphic elements present in Jetpack Compose are present in Compose Multiplateform.
There are no precise guidelines in terms of architecture when it comes to developing an application using Compose Multiplateform and KMP.
Compose Multiplateform does not have an official navigation library, as is the case with Jetpack Compose, even though the community offers several.
Although Circuit is still under development, it does address some of these issues, to use it you have to follow some architecture and already integrates a navigation library and many others like you will see throughout this article.
4. Circuit Core Components
Circuit comes with 3 major components
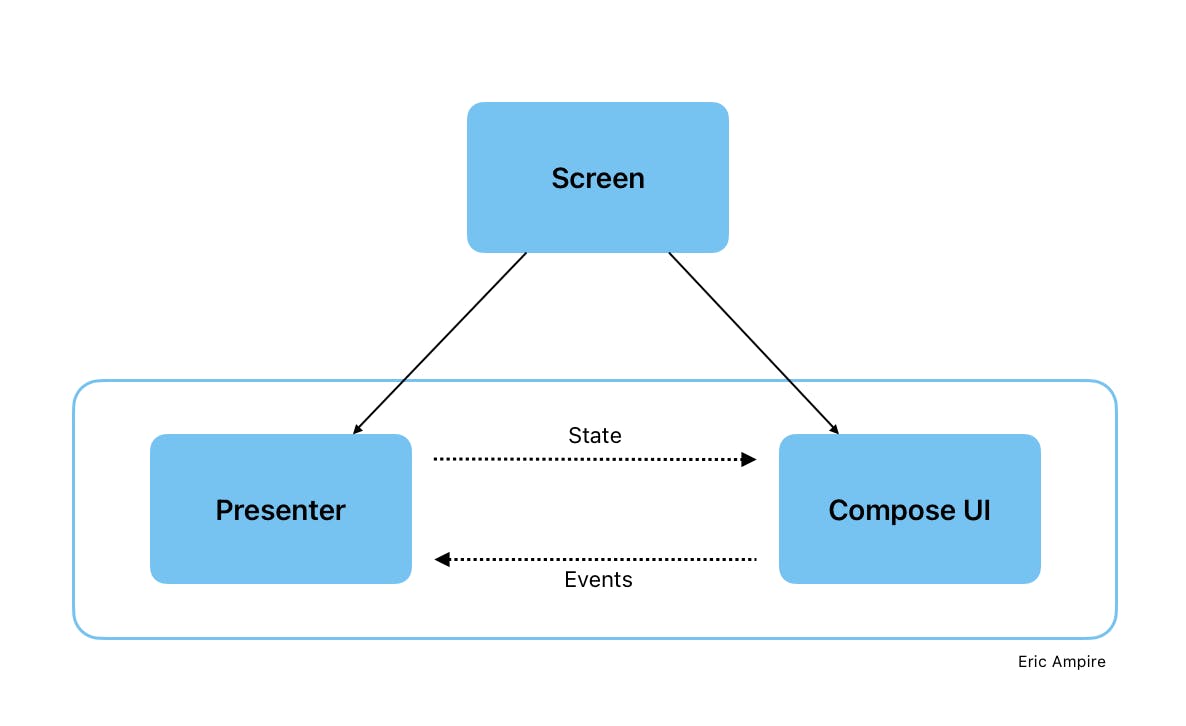
The presenter : This component can be likened to a ViewModel, and is therefore responsible for the UI's business logic.
The UI : This represents our interface
The Screen : This component links the first two, i.e. the UI and the Presenter.

5. Setup the project
Before starting to write a line of code, it's important to make all the necessary configurations to make Kotlin Multiplatform work as explained here.
Then you need to create a Compose Multiplatform project using the KMP Wizard available here
A. Download the project
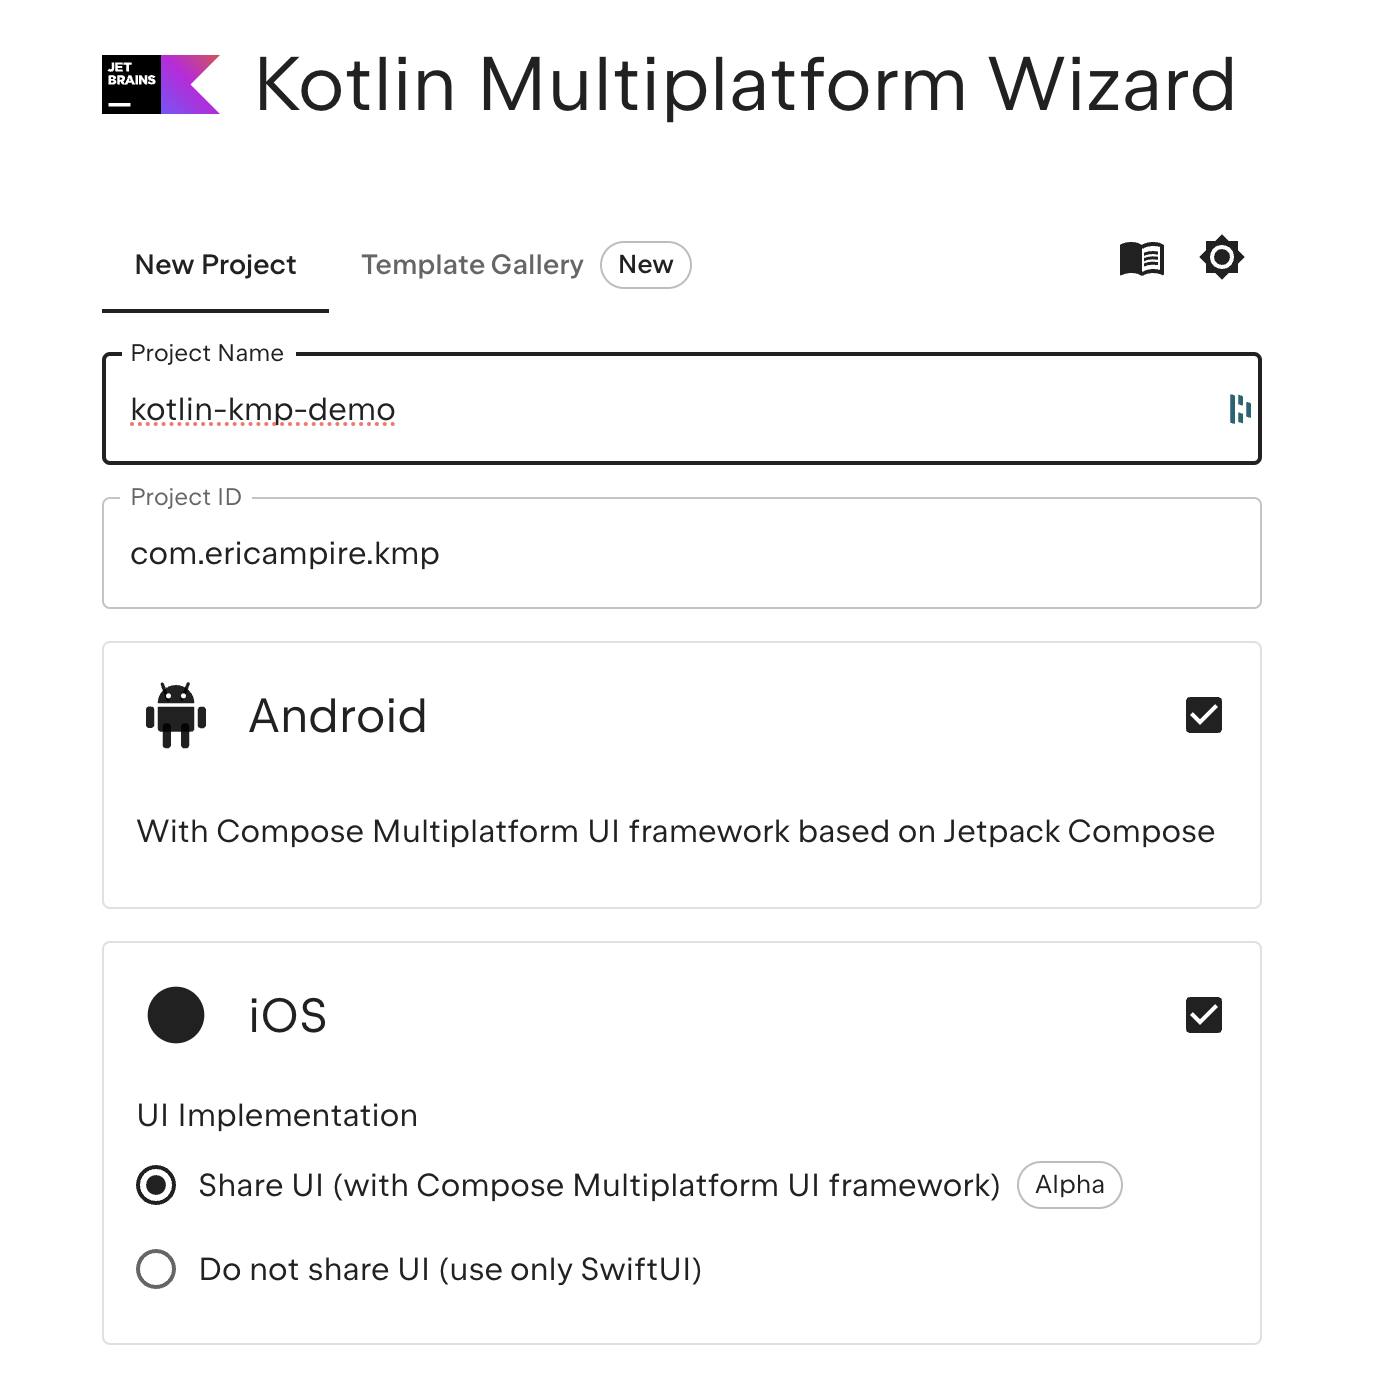
With the Kotlin Multiplatform Wizard you can set :
The project name
The project ID
The target platforms, in our case Android and iOS
Select whether to use Compose Multiplatform for the UI or not (in our case we'll select it)
After all that, just click on the download button to download the project in a zip file, then the only thing you need to do from there is unzip the project, then open it with Android Studio with the KMP plugin installed, if your environment isn't configured yet you can click here to do so.
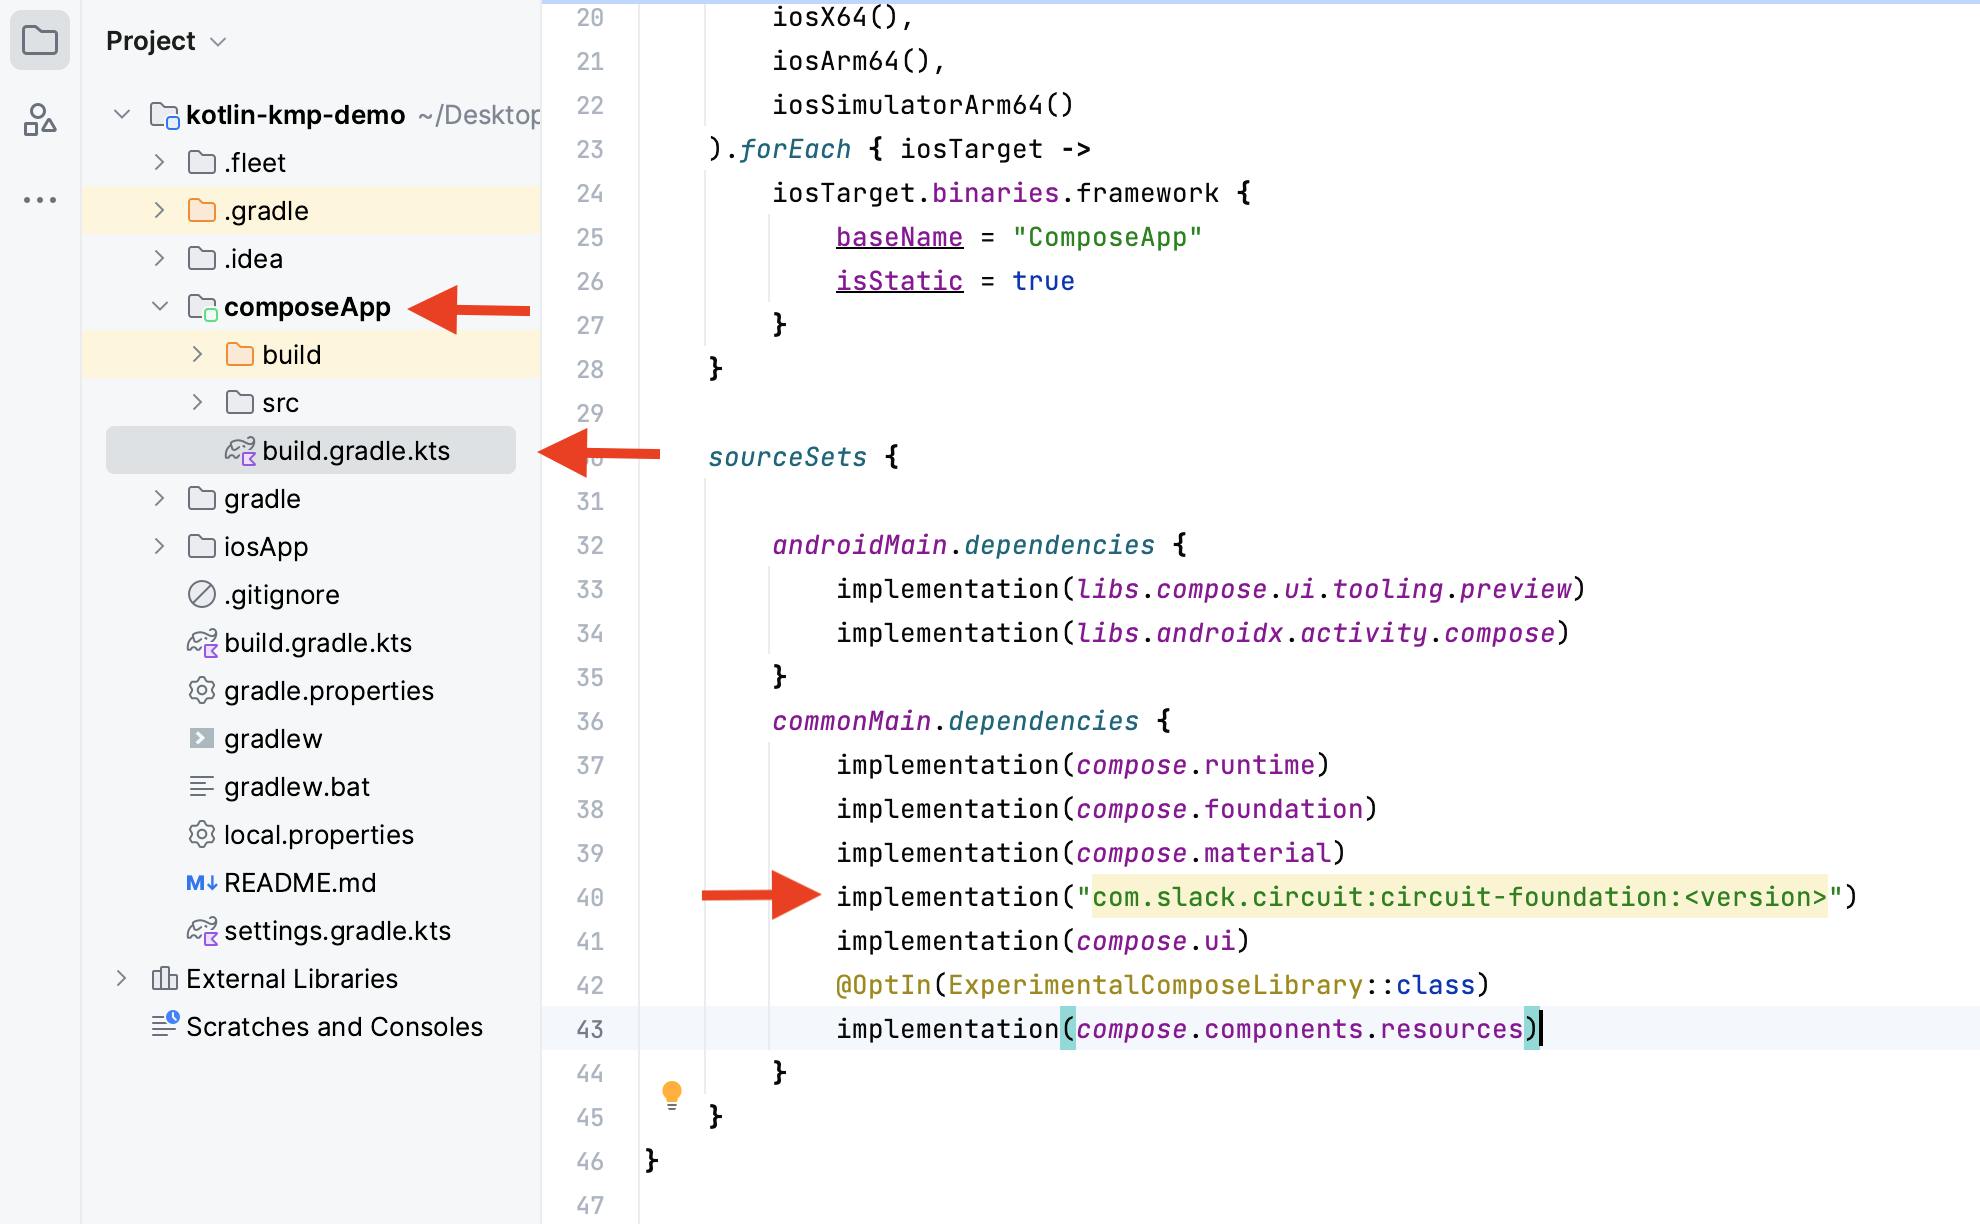
B. Add Circuit dependencies
The simplest way to get up and running is with the circuit-foundation dependency, which includes all the core Circuit artifacts.
dependencies {
    implementation("com.slack.circuit:circuit-foundation:<version>")
}
Note*:* You can found the latest version of Circuit on the official github repository by using the following link
When you setup the project with the KMP Wizard you will not found the common or shared folder like we used to see on a regular KMP project, so make sure to put the dependency in the right place like on the following screenshot
6. Circuit Presenter
At this stage our project is well configured, so it's time to get down to business.
As I mentioned above, the presenter is similar to the ViewModel in a classic Android project, i.e. it contains the business logic attached to the UI.
To illustrate all this, we'll create a small project allowing the user to decrement and decrement a value, and to illustrate navigation we'll add a button to navigate from one view to another.
A. Event and State
Before creating our Presenter, we need two components:
The event : A sealed class (or interface) that implements the
CircuitUiEventinterface and represents actions originating from the view and destined for the presenter. In other words, to modify the state of the view, an action or event must be transmitted to the Presenter.State : A data class that implements the
CircuitUiStateInterface and represent the state of the UI.
// Events
sealed interface CounterEvent : CircuitUiEvent {
    data object Increase : CounterEvent
    data object Decrease : CounterEvent
}

// State
data class CounterState(
    val count: Int,
    val eventSink: (CounterEvent) -> Unit
) : CircuitUiState
As you can see, the sealed interface CounterEvent has only two actions that represent the actions we'll have to perform on our UI, Increase and Decrease.
And the CounterState just has an Integer count that represents the value we'll start incrementing or decrementing, In a complex application, the state could be more complex than that.
Note :CounterState also has a lambda that takes a CounterEvent object as its parameter, because with Circuit, actions or events are passed to the Presenter from the state, as illustrated by this graph.
A. The presenter implementation
In Circuit a Presenter is a class implementing the Presenter<T> interface with T a data class representing the state of the UI, in our case T will be replaced by CounterState like in the following code
class CounterPresenter : Presenter<CounterState> {
    // TODO
}
When implementing the Presenter<T> interface, we'll need to override the present method, which will contain all the business logic associated to the UI
class CounterPresenter : Presenter<CounterState> {

    @Composable
    override fun present(): CounterState {
        var count by remember { mutableStateOf(0) }
        return CounterState(
            count = count,
            eventSink = { event ->
                when(event) {
                    CounterEvent.Decrease -> count--
                    CounterEvent.Increase -> count++
                }
            }
        )
    }
}
As you can see, a strange thing appears after you've override the presenter method. As you've probably guessed, it's the @Composable annotation, and yes, the same annotation we use when we develop our Jetpack Compose applications from the androidx.compose.runtime package.
You may ask why we put this annotation, well the answer is simple: Circuit uses the Jetpack Compose runtime to manage all the reactive parts of the Presenter, and the runtime can be used independently of Compose UI, as is the case with Circuit.
And since the present method has the @Composable annotation, we can create and remember a State object that can be observed by the runtime like we used to do in Jetpack Compose.
var count by remember { mutableStateOf(0) }
The last thing to mention for the Presenter is that the present method returns the State, so to fully implement our presenter, we need to create an instance of CounterState,
As I mentioned earlier, we need to pass a lambda to CounterState, which will be used by the UI to pass events to the presenter.
return CounterState(
   count = count,
   eventSink = { event ->
       when(event) {
           CounterEvent.Decrease -> count--
           CounterEvent.Increase -> count++
       }
    }
)
In our case we only have two events, Increase and Decrease, and for each event we perform the corresponding action, i.e. modify the count value, and each time the value is modified, there's a recomposition that will cause the present method to return a new state with the new value.
And this is how Circuit take advantage of the Compose Runtime
7. The Circuit UI
The circuit interface is just a Composable that takes the state of the counter, so all we have to do is attach our state to the different elements of the UI, as shown in the following code.
@Composable
fun CounterUI(modifier: Modifier = Modifier, state: CounterState) {
    Column {
        Button(
            onClick = {
                state.eventSink(CounterEvent.Decrease)
            },
            content = { Text("+") }
        )
        Text(text = "Count ${state.count}")
        Button(
            onClick = {
                state.eventSink(CounterEvent.Increase)
            },
            content = { Text("+") }
        )
    }
}
Each time you want to send an event to the presenter, simply call state.eventSink(Event) and then pass the corresponding event.
8. Circuit Screen
So far so good, but how are the Presenter and the UI connected?
As I showed in the previous graphic, the Presenter and UI are connected via the Screen Component, which is nothing more than an object or class that implements the Screen interface, as shown in the following code, and the Screen component is responsible for passing data from one Ui to another.
@CommonParcelize
object CounterScreen : Screen

// or

@CommonParcelize
expect data class CounterScreen(val data: Int) : Screen
As you can see, the Screen CounterScreen uses the @CommonParcelize annotation, but why?
This annotation is important because on Android, the Screen must be Parcelable for the screen state to be correctly saved, on IOS it doesn't need to be Parcelable.
And here's how you can create that custom annotation with the actual/expect mechanist from Kotlin Multiplatform.
Step 1 : Add the Kotlin Parcelize Plugin
To have access to Kotlin Parcelize you need to add the plugin in build.gradle.kts from the project
plugins {
    // this is necessary to avoid the plugins to be loaded multiple times
    // in each subproject's classloader
    alias(libs.plugins.kotlin.parcelize) apply false

    alias(libs.plugins.androidApplication) apply false
    alias(libs.plugins.androidLibrary) apply false
    alias(libs.plugins.jetbrainsCompose) apply false
    alias(libs.plugins.kotlinMultiplatform) apply false
}
Then apply the plugin in the in build.gradle.kts in the common sourceSet
plugins {
    alias(libs.plugins.kotlinMultiplatform)
    alias(libs.plugins.androidApplication)
    alias(libs.plugins.jetbrainsCompose)
    alias(libs.plugins.kotlin.parcelize) // Here
}
Step 2 : The expect Implementation of CommonParcelize
@Target(AnnotationTarget.CLASS)
@Retention(AnnotationRetention.BINARY)
expect annotation class CommonParcelize()

// For Android @TypeParceler
@OptIn(ExperimentalMultiplatform::class)
@OptionalExpectation
@Retention(AnnotationRetention.SOURCE)
@Repeatable
@Target(AnnotationTarget.CLASS, AnnotationTarget.PROPERTY)
expect annotation class CommonTypeParceler<T, P : CommonParceler<in T>>()

// For Android Parceler
expect interface CommonParceler<T>
Step 3 : The actual Implementation of CommonParcelize on Android
Note : Make sure to add the kotlin parcelizeorg.jetbrains.kotlin.plugin.parcelize
In the android sourceSet, you need to provide the implementation of the CommonParcelize that has been set previously in the common sourceSet
actual typealias CommonParcelize = kotlinx.parcelize.Parcelize

actual typealias CommonParceler<T> = kotlinx.parcelize.Parceler<T>

actual typealias CommonTypeParceler<T, P> = kotlinx.parcelize.TypeParceler<T, P>
Step 4 : The actual Implementation of CommonParcelize on iOS
On iOS there is no need to have a parcelable
actual interface CommonParceler<T>

@Target(AnnotationTarget.CLASS)
@Retention(AnnotationRetention.BINARY)
actual annotation class CommonParcelize actual constructor()
9. Circuit Factories
We're almost done, but there's one last thing to implement before our application is complete. So it's time to tell Circuit how it's going to create all these components and connect them so that we have something that works.
This is where the Circuit factories comes into play, in our case we'll need two
Ui.Factory : Responsible for creating the UI attached to each Screen in our application.
Presenter.Factory : Responsible for creating all the presenters in our application.
Step 1 : Create the UI Factory
To create the UI Factory, simply create a class that implements the Ui.Factory interface, then override the create method, as shown in the following code.
class UiFactory() : Ui.Factory {
    override fun create(screen: Screen, context: CircuitContext): Ui<*>? {
        return when (screen) {
            is CounterScreen -> ui<CounterState> { state, modifier ->
                CounterUI(state = state, modifier = modifier)
            }
            else -> null
        }
    }
}
As you can see, the create method takes a Screen instance and the CircuitContext as parameters, and for each Screen we call the corresponding @Composable, and passing to it the corresponding state,
This is how a Screen Circuit is attached to a Ui made with Compose.
Step 2 : Create the Presenter Factory
The Presenter is quite similar to the UI Presenter as you can see in the following code
class PresenterFactory : Presenter.Factory {
    override fun create(
        screen: Screen,
        navigator: Navigator,
        context: CircuitContext
    ): Presenter<*>? {
        return when(screen) {
            is CounterScreen -> presenterOf {
                CounterPresenter().present()
            }
            else -> null
        }
    }
}
The only difference is that the create method takes an additional parameter, the Navigator, which can be passed to the presenter if you want to navigate from one Screen when the UI triggered a specific Event.
The navigation can be done like this.
navigator.goTo(Screen)
10. Put everything together
Now we can connect all the components we've created to the entry point of our Compose Multiplatform application, as shown in the following code.
@Composable
fun App() {
    MaterialTheme {
        // Circuit instance
        val circuit = Circuit.Builder()
            .addUiFactory(UiFactory())
            .addPresenterFactory(PresenterFactory())
            .build()

        // SaveableBackStack instance
        val backstack = rememberSaveableBackStack {
            push(CounterScreen)
        }

        // Navigator instance
        val navigator = rememberCircuitNavigator(
            backstack = backstack,
            onRootPop = {}
        )

        CircuitCompositionLocals(circuit) {
            NavigableCircuitContent(navigator, backstack)
        }
    }
}
To make our application work, we need to create three components
A
Circuitinstance that creates the connection between factories we created in the previous section.An instance of
SaveableBackStackto manage the BackStack of our application when we navigate from one view to another, and this component allows us to define the main View of our application using thepush(Screen)method.A
Navigatorinstance is the equivalent of theNavControllerin a classic Android application, and allows you to switch from one view to another.
To connect all these elements together we need a CircuitCompositionLocals a NavigableCircuitContent provided by circuit as shown in the following code.
CircuitCompositionLocals(circuit) {
    NavigableCircuitContent(navigator, backstack)
}
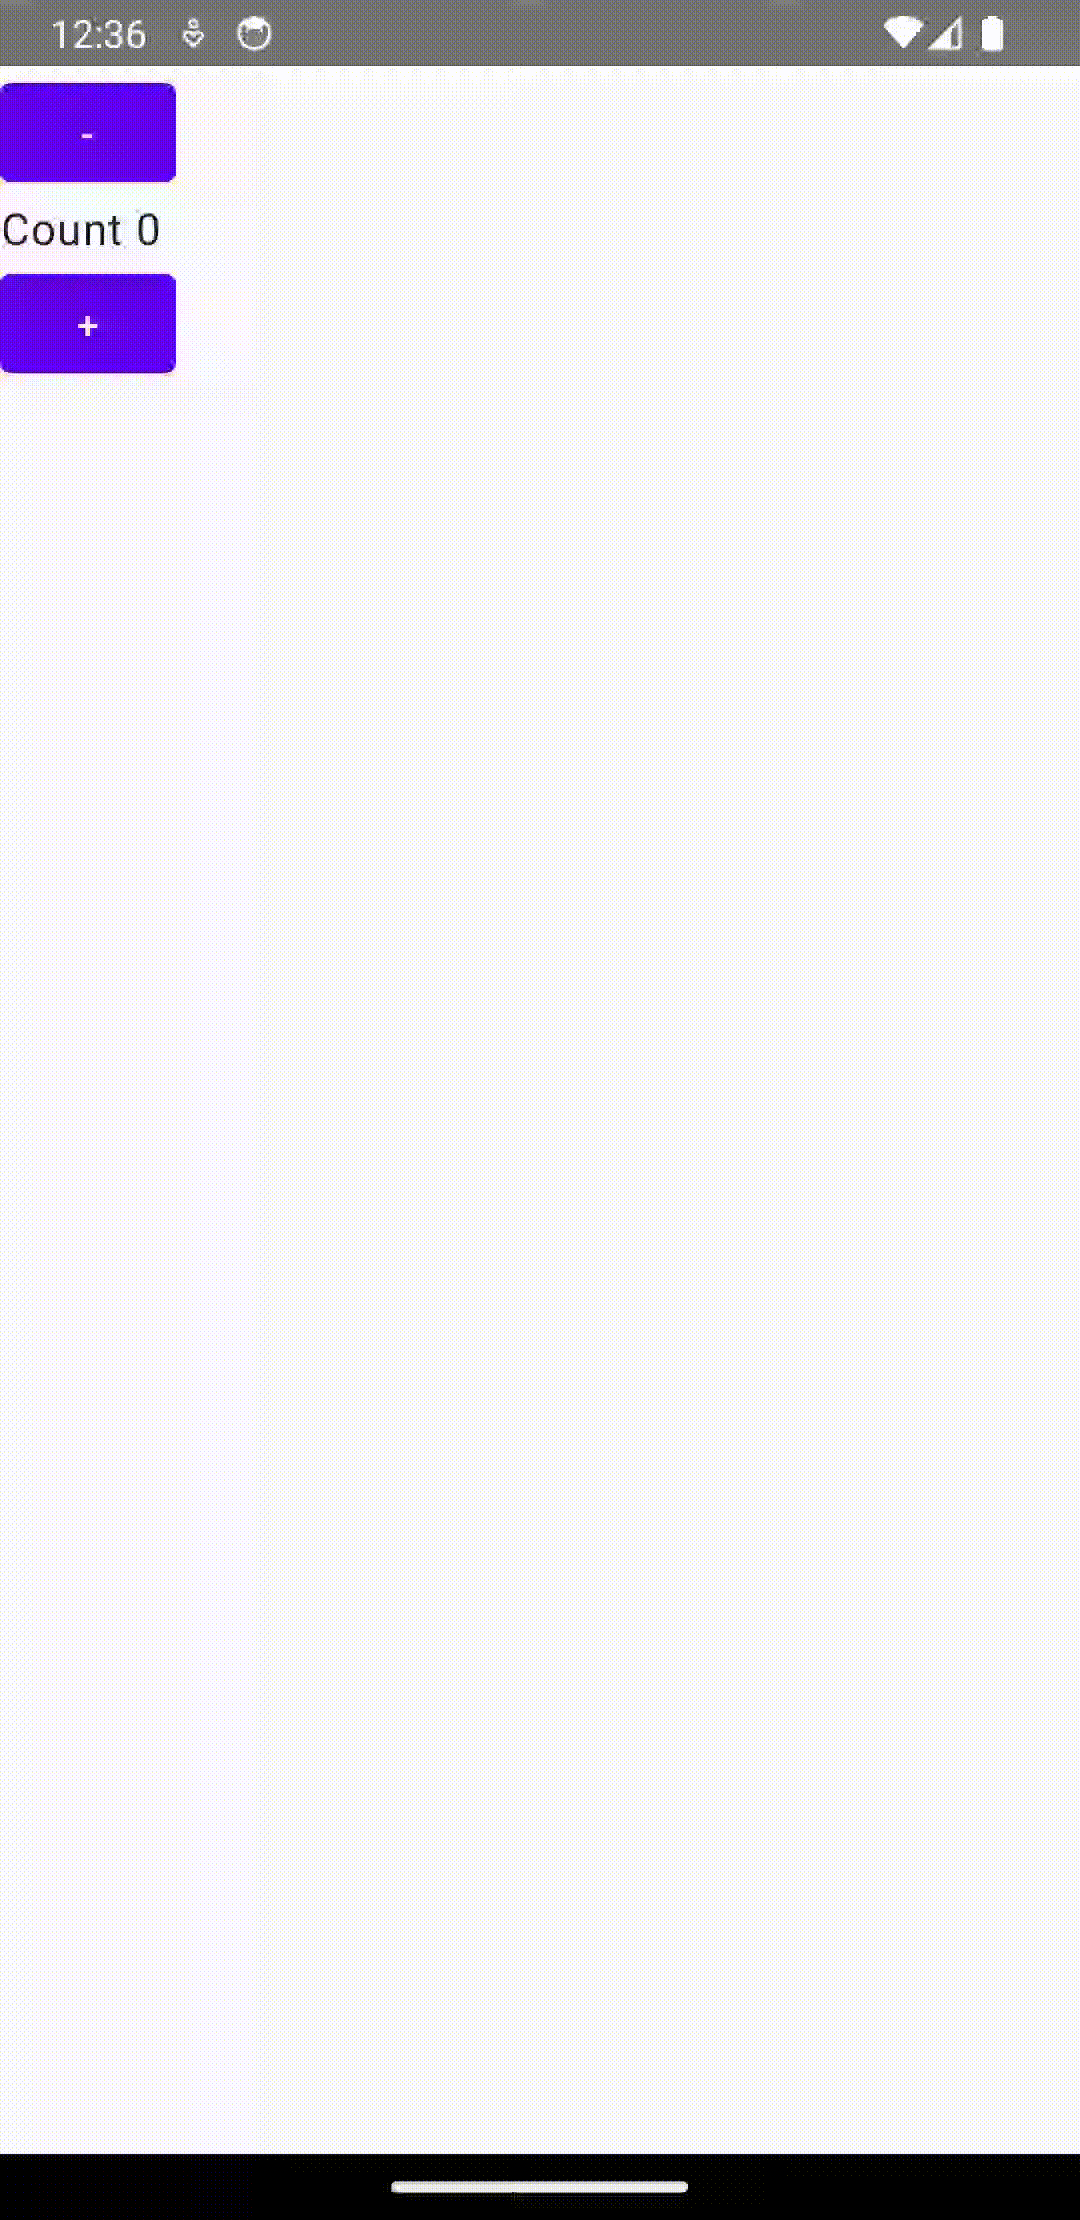
Now if you run the application you will have something like this, and you can found the full project on my github
11. Conclusion
It's true that Circuit is still under development, but I hope this article has helped you to understand its power and practicality when it comes to developing applications with KMP. Its current design is probably subject to change, so don't hesitate to play with it or even contribute to make up your own mind.
12. References
Circuit : https://github.com/slackhq/circuit
Compose Multiplatform : https://www.jetbrains.com/lp/compose-multiplatform/